While sous vide cooking produces some of the finest meals in the world, it can lack the conventional flavors we’re accustomed to from grilling, barbecuing, smoking, or even oven roasting. Here are a few hacks to use, so that will never happen again.
Always Brine First
Brining most all meat, including beef, for sous vide cooking will add a robust flavor of your choice. The brine acts to dissolve tough muscle tissue, making your meat more tender. The salt reduces water loss during cooking, resulting in meat that is more tender, juicier, and flavorful. The combination of the salt and acids in the brine can kill certain pathogens too, so there’s a significant food safety advantage as well.
Don’t confuse brining with marinating. Marinating is simply soaking the meat in a flavorful bath, and will not affect more than about the first 1/4″ of the meat. If your meat is 1/2″ or less in thickness (12mm), you can marinate with similar results, assuming you’re using a salt solution that’s at least 1/4 cup of salt per quart of water. The problem with marinating is that the acids can make the surface of the meat mushy if left too long in the marinade, but will leave the core unaffected and unflavored.
-
Use A Meat Injector to Brine
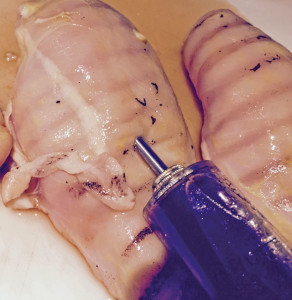
Using a meat injector is by far the best way to flavor most meats. Your brine will immediately begin to work on the core of the meat, not just the outsides. I always make extra, and pour the remainder into a ziplock bag after injecting.
A real world test proved to us that injecting brine yields a much better flavor than marinating or using simple seasonings on the meat, prior to the water bath. Using two chicken breasts for each method, we used just salt and pepper on one group, marinated another group in a brine solution, and injected the third group. We cooked the breasts for one hour at 146°, the required core temperature for full pasteurization. We then finished them by coating them with a thin layer of olive oil (not extra virgin–use the refined or cheap stuff for a higher smoke point), then some of our favorite chicken rub, and a 60 second per side sear at 450°F in a cast iron pan.
The results were conclusive. The brine injected breasts were much more moist and tender, and had a noticeably better taste than the other two methods yielded.
As sous vide cooking done safely is pasteurizing, unlike cooking a burger or steak to medium rare on the grill, punching through the surface of any meat is safe, because the pathogens that may be pushed from the surface to the core will be killed through the pasteurization process.
A good meat injector does not have to be expensive, but it should have at least one stainless steel needle, and more is preferable to match the size and thickness of the meat.
We like this all stainless steel injector with two needles for around $20. My injector above has a plastic barrel which is OK too, but for a few more dollars, an all stainless meat injector is a superior product.
Brining times vary by the type of meat, thickness, and brine content. We’ve found that a 5% solution for around 4-6 hours works better than a 10% solution for a shorter time. Neither is salty, but the longer time closes up the meat grain tighter, if that’s your desired result. A 10% brine is one third cup (6 level tablespoons) of kosher/sea salt per quart of water; a 5% brine is half that much, or 1/6th of a cup (3 level tablespoons). We use sugar, molasses, honey, or syrup in the same quantity as the salt, and add garlic and onion powder to taste. A 1/4 cup of sea salt per quart of water is a good compromise; we often use those proportions too.
When injecting, take your time. A good needle will have 6-9 tiny holes for the brine to escape the needle, allowing good dispersement throughout the core. Plunge slowing, picking several spots in each piece of meat to ensure the brining is consistent throughout. Refrigerate for the time appropriate for your brine and meat, then rinse off the surface with cold water to remove any excess salts from the brine in which the meat has been soaking.
Two meats I don’t inject are steaks less than 2″ thick, and most fish. A good steak should not be marinated anyway, as you really want the natural flavor to pop. Fish should always be brined, but a soak in a ziplock bag is fine as they are usually quite thin and very absorbent. For a cheap steak or roast like a chuck roast, absolutely brine with a flavorful marinade with a 5% salt content.
Use Cold Smoking to Flavor Almost Everything
Cold smoking is a wonderful way to add that outdoor flavor without cooking. No sous vide setup alone can give you this taste, regardless of how you season it. Done at close to ambient outside air temperatures, cold smoking is relatively safe, if you religiously follow the USDA/FDA guidelines (see our cold smoking article linked below).
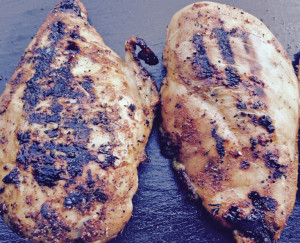
As your meat will not be cooked in cold smoking, you can cold smoke before or after brining. We prefer to brine first, but in the photo above you can see some grill marks where we did smoke it first. Due to our high mid day temps here in Central California, we need to cold smoke early in the morning or late in the evening for a good part of the year.
We love the Amazen Pellet Smoker which comes with complete instructions and a couple of bags of pellets for around $40. That’s the best cold smoking setup we’ve ever used, and recommend it highly. We detail how to use it, along with complete guidelines and a step-by-step process for successful cold smoking in our guide to successful and safe cold smoking.
Use A Good Rub Before the Water Bath
Rubs add an initial burst of flavor when first tasting the meat, and in the water bath the meat will absorb some of it inside. Everyone has a favorite rub, whether produced commercially or mixed at home. Another twist I like is the use of powders, not normally found in most stores. I’ve experimented with hickory powder, charcoal seasoning, and worcestershire powder. The hickory powder leaves a faint smoke taste, but not enough to make much difference. Piled on, the charcoal seasoning also leaves a faint taste reminiscent of charcoal grilling. It’s not bad, but the cold smoking process yields a far richer taste. The worcestershire powder, however, is a real find. It’s not inexpensive, but you should try a 4 oz. packet for not much monetary risk, and if you like it as much as I do for beef and burgers, you can buy in larger quantities to save some money. This link is to Spice Jungle through Amazon; American Spice Company also has a great selection of hard to find powders and spices.
You can, and in most cases should, use a more generous amount of rub than you would when grilling or barbecuing, as the sous vide water bath will not caramelize or burn it. One spice you DO want to use sparingly, is garlic or garlic powder. For some reason, the sous vide has a steroidal effect on garlic, and it’s easy to end up with an overpowering garlic flavor. Be gentile and sparing with garlic.
Before we go to the next step, creating the Maillard reaction by searing at high temperatures, and after your sous vide cook is done, be sure to shake off any excess rubs and powders as the high heat will burn it and can leave an unpleasant taste.
Creating the Maillard Reaction Through Searing
There are loads of articles explaining the Maillard reaction, but simply put, it’s browning the meat to create an amino acid reaction that puts forth the taste you want from a finished piece of meat or fish. Without creating the Maillard Effect, your meat from the sous vide water bath not only will look quite unappetizing, it won’t have the finished taste you’re after. This step is not an option; it’s mandatory for proper cooking.
Regardless of the searing method below that you choose, here’s a secret I use on anything I sear that does not include a sugar-rich sauce, like most barbecue sauces. First, lightly dust a sprinkle of baking soda on both sides of the meat, which raises the alkalinity, or pH, to speed up Maillard-ing. It just takes a little dusting so be vary sparing; you certainly do not want to have a baking soda taste, and you won’t if you’re careful. Next, with a silicone baking brush, brush on a thin layer of dark corn syrup, which is essentially fructose. Again, make it a thin layer as you don’t want anything but a very slight hint of sweetness to come through when tasting.
This combination is often all you’ll need to do a good sear, but you may want to add some sea salt, unless your rub contains a lot of it, then don’t. Don’t use pepper before searing; it can burn and taste like it. Use fresh ground pepper to taste only after completing searing.
There are three main ways to sear: A frying pan, a hot gas or charcoal grill, and a small butane torch.
-
Cast Iron Frying Pan
Of all three methods, this has become my overall favorite for several reasons. One, it’s the most efficient, because cast iron disperses the heat evenly and gets very hot quickly. For steaks, it’s by far the best option, as more than about 30 seconds per side will actually cook the steak more, often more than you’d like. This is the problem with a grill. The heat is not as direct and it takes longer to get a good sear, thus the meat can cook beyond your preferred range.
We use and recommend this Lodge 10″ Pre-Seasoned Cast-Iron Skillet for three reasons. One, if you’re going to have only one cast iron skillet, the 10″ size is what you’ll need. It’s large enough to accommodate most meats, and small enough to provide a surface for smaller foods. Next, it’s Lodge, and they are known for their quality and have been for years. Their prices are often shockingly reasonable, too. Finally, Lodge is the last American foundry for cast iron, so you’re buying American.
I’ll use a little refined (not virgin/extra virgin) olive oil, avacado oil (both relatively high smoke points) or for fish, sometimes even a steak, butter. Wait until your fat starts to smoke, and place your meat in the pan. Fish, steaks, and think cut chicken breasts are seared after only about 30 seconds per side, and for thinner fish ( I love Swai), 15-20 seconds is adequate, after being cooked sous vide.
-
Charcoal or Gas Grill
I’m not usually a proponent of a gas grill, and always use my charcoal Weber when grilling or even barbecuing sometimes, but in this case, especially with the addition of a Lodge cast iron grill grate (what I use) or the popular Grill Gates
, both of which act to disperse heat quickly and do add some temperature to the cooking surface, an outdoor grill can work well, especially with a larger, thicker steak or roast, or full chicken breast that is not so prone to cook during the sear. Because of the short searing time, you won’t add any outdoor flavor with either gas or charcoal, but you’ve already done that with cold smoking.
Charcoal burns hotter than gas, unless your gas grill has an infra red coil (use that!), but to me it’s a PITA to set up a charcoal grill for two minutes of searing, so I don’t. You do need either of the above grates for even searing, and either are huge benefits when doing conventional grilling too.
-
Butane Torch
I freakin’ LOVE my little Iwatani torch ! The butane cans (get them at Asian markets for much less than on Amazo
 n) seem to last forever, and it’s SO handy for a quick sear, especially on thin fish and chicken breasts, and for filling in spots that your pan or grill missed for larger cuts of meat. It’s about a 1200° flame. Just passing the torch across the meat several times does the job. It takes longer than the other two methods, but it’s EASY and frankly fun to use! These chicken breasts were seared on a gas grill with the Lodge grate, but as they were uneven I filled in the sides with the Iwatani. I often use it for fish too, and for veggies that I don’t want to have any oil from the pan or grill.
The Iwanani has other uses too. I use it to sterilize the needles for my injector, and to start the pellets smoking in the A-Maze-N Smoker. It’s also handy for sweating copper if you ever have that need, and for loosening stubborn nuts and bolts. And…..you know those weeds that crop up in your driveway? ZAP! Seriously friends, this little thing is one of the additions to your toy box you’ll wish you would have bought earlier.
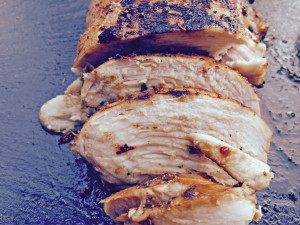
Here is one of the breasts above that was brined, smoked, sous vide cooked, and seared. Look at the texture of the meat–it’s like an oven roasted turkey– moist, and fork tender, and with great taste too. You cannot achieve those results without using all these steps.
Using these tricks and techniques, you’ll find that every dish you serve now has a much more robust, deep flavor, and you are the boss of those flavors with your spice and seasoning selection. Experiment, have some fun, and let us know any other taste enhancing hacks your discover.


Leave a Reply